python serverless websocket 서버 만들기 1부
December 11, 2021

- 웹소켓 서버를 serverless 환경으로 선택하는 이유
- 사전 준비사항
- 의존성 요구사항
- aws credentials 설정
- 프로젝트 폴더 생성, 의존성 설치
- 간단한 ping 함수 배포
- 커넥션을 관리할 Database
- Websocket connection function 작성
- 메세지 전송
- 1부 마무리
웹소켓 서버를 serverless 환경으로 선택하는 이유
절대 서버리스를 silver bullet 으로 생각하지 말자. 여러가지 선택지 중 한 가지일 뿐이다.
트래픽이 일정수준 이상이 되면 온프레미스 서버를 사용하는것이 저렴하다.
aws 에서 2018년 12월에 api gateway 용 websocket protocol을 공개했다.
나는 스타트업에서 일하고 있으며 내가 처한 상황과 완전히 들어맞는다고 생각해서 서버리스 환경을 선택했다.
서버리스 도입을 고민하고있다면 다음 체크리스트에 모두 해당하는지 확인하고 도입하도록 하자.
- 트래픽이 예측 불가능하거나 무의미한정도로 트래픽이 없다
- 시스템 장애에 대응, 관리할 인원이 적거나 없다
- 위 사항에 모두 해당하고 보다 저렴하게 사용하고싶다
사전 준비사항
시작하기에 앞서 serverless websocket 을 구성하기 위해 몇가지 준비가 필요하다.
아래 순서는 이 포스트에서 설명하지 않을 예정이다.
- aws 계정생성하기
- iam access key 생성하기
- node, npm, python3.9, pipenv 설치
의존성 요구사항
serverless websocket 을 배포하기 위해서는 다음과 같은 의존성 설치가 필요하다.
설치 방법은 아래에 따로 설명할 예정이니 그냥 슥 보고 넘어가자.
aws credentials 설정
~/.aws/credentials 파일에 iam 에서 설정한 access key를 다음과 같이 적어준다.
[default]
aws_access_key_id = <YOUR_ACCESS_KEY>
aws_secret_access_key = <YOUR_SECRET_KEY>
프로젝트 폴더 생성, 의존성 설치
프로젝트 폴더를 생성한다.
mkdir serverless-websocket-tutorial
cd serverless-websocket-tutorial
pipenv 를 이용해서 가상환경을 생성한다. 다른 프로젝트와 의존성관리를 별도로 하기 위해서 필요한 절차이다.
pipenv --python 3.9
pipenv shell
aws 에 배포를 위해 serverless 를 설치한다.
sudo npm install -g serverless간단한 ping 함수 배포
serverless.yml 파일을 생성하고 다음과 같이 작성한다.
service: serverless-websocket

provider:
  name: aws
  runtime: python3.9
  lambdaHashingVersion: '20201221'
  region: ap-northeast-2

functions:
  ping:
    handler: handler.ping
    events:
      - http:
          path: ping
          method: get
handler.py 파일을 생성하고 다음과 같이 작성한다.
def ping(event, context):
    response = {
        "statusCode": 200,
        "body": "PONG!"
    }
    return response
이제 간단한 ping 함수를 배포할 준비가 되었다.
다음 명령어로 앱을 배포해보자.
serverless deploy아래처럼 콘솔에 표시될것이다.
Serverless: Running ...
Serverless: Packaging service...
Serverless: Excluding development dependencies...
Serverless: Injecting required Python packages to package...
Serverless: Uploading CloudFormation file to S3...
Serverless: Uploading artifacts...
Serverless: Uploading service serverless-websocket.zip file to S3 (9.76 MB)...
Serverless: Validating template...
Serverless: Updating Stack...
Serverless: Checking Stack update progress...
......................................
Serverless: Stack update finished...
Service Information
service: serverless-websocket
stage: dev
region: ap-northeast-2
stack: serverless-websocket-dev
resources: 5
api keys:
  None
endpoints:
  GET - https://{{your-host}}.execute-api.ap-northeast-2.amazonaws.com/dev/ping
functions:
  ping: serverless-websocket-dev-ping
layers:
  None
Serverless: Removing old service artifacts from S3...
위에 표시된 endpoints 를 웹에서 접근하면 PONG! 이라는 글자를 볼 수 있다.
curl https://{{your-host}}.execute-api.ap-northeast-2.amazonaws.com/dev/ping
PONG!
이제 본격적으로 websocket 을 만들어 보겠다.
커넥션을 관리할 Database
웹소켓이 제대로 동작하기 위해서는 pub/sub 역할을 하는 function 과 수신자 정보를 보관할 저장소가 필요하다.
저장소는 serverless 를 사용하는 목적에 걸맞게 dynamodb 를 사용할 예정이다.
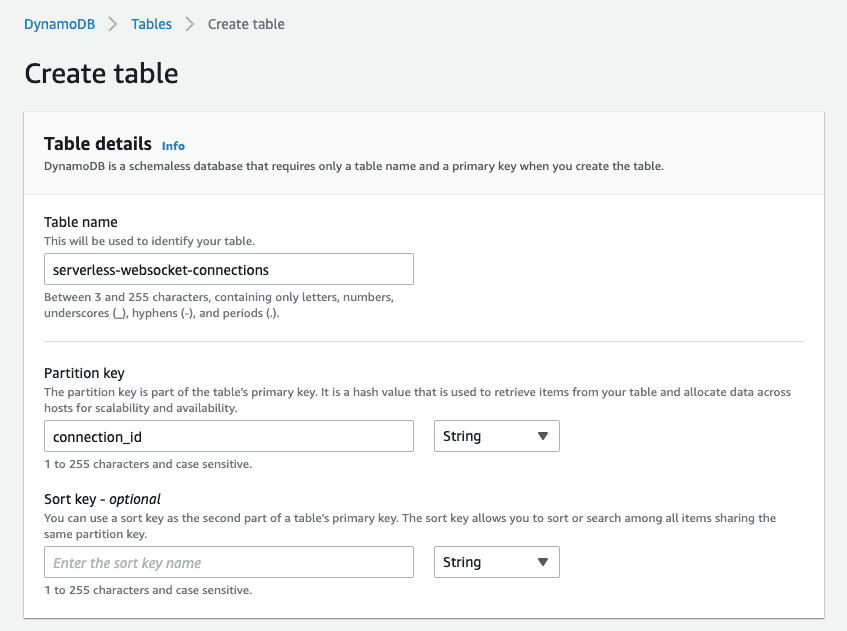
serverless-websocket-connections 라는 이름의 table 을 생성한다.

아래 Settings 에 on-demand와 provisioned 를 선택하는 항목이 있는데 지금은 아무거나 선택해도 무방하다.
나중에 아래 글을 읽어보고 스스로 결정하도록 하자.
DynamoDB On-Demand: When, why and how to use it in your serverless applications
지금은 Default settings 를 선택하고 넘어가도록 한다.
dynamodb 를 읽어올 권한을 위해 serverless.yml 파일에 권한 설정을 한다.
service: serverless-websocket

provider:
  name: aws
  runtime: python3.9
  lambdaHashingVersion: '20201221'
  region: ap-northeast-2

  iamRoleStatements:    - Effect: 'Allow'      Action:        - 'dynamodb:PutItem'        - 'dynamodb:GetItem'        - 'dynamodb:UpdateItem'        - 'dynamodb:DeleteItem'        - 'dynamodb:BatchGetItem'        - 'dynamodb:BatchWriteItem'        - 'dynamodb:Scan'        - 'dynamodb:Query'      Resource:        - 'arn:aws:dynamodb:ap-northeast-2:*:*'
  ping:
    handler: handler.ping
    events:
      - http:
          path: ping
          method: get
python 에서 사용할 의존성 을 위해 serverless plugin 을 설치한다.
serverless plugin install -n serverless-python-requirementsserverless.yml 맨 아래에 다음줄을 추가한다.
plugins:
  - serverless-python-requirements

custom:
  pythonRequirements:
    dockerizePip: false
    noDeploy: []
pipenv 로 boto3 를 설치한다.
pipenv install boto3이제 프로젝트내에는 다음 파일들이 있어야한다.
handler.py
node_modules/
package-lock.json
package.json
pipfile
pipfile.lock
serverless.yml
Websocket connection function 작성
이제 모든 준비가 끝났다.
소켓이 연결하고 끊길때 작동하는 함수를 작성한다.
handler.py 에 다음을 추가해준다.
import logger
logger = logging.getLogger("handler_logger")
logger.setLevel(logging.DEBUG)

def connection_manager(event, context):
    connection_id = event["requestContext"].get("connectionId")

    if event["requestContext"]["eventType"] == "CONNECT":
        logger.info("Connect requested")
        # connection_id 를 생성한다.
        table = dynamodb.Table("serverless-websocket-connections")
        table.put_item(Item={"connection_id": connection_id})
        return {"statusCode": 200, "body": "Connect successful."}

    elif event["requestContext"]["eventType"] == "DISCONNECT":
        logger.info("Disconnect requested")
        # connection_id 를 삭제한다.
        table = dynamodb.Table("serverless-websocket-connections")
        table.delete_item(Key={"connection_id": connection_id})
        return {"statusCode": 200, "body": "Disconnect successful."}
    else:
        # 정의되지 않은 이벤트 타입인 경우
        logger.error("Connection manager received unrecognized eventType '{}'")
        return {"statusCode": 500, "body": "Unrecognized eventType."}
websocket 연결을 허용하기 위해 serverless.yml 에 다음을 추가해준다.
provider:
  ...
  iamRoleStatements:
    - Effect: "Allow"
      Action:
        - "execute-api:ManageConnections"
      Resource:
        - "arn:aws:execute-api:*:*:**/@connections/*"
그리고 websocket 라우팅을 위해 다음 또한 추가해준다.
functions:
  connectionManager:
    handler: handler.connection_manager
    events:
      - websocket:
          route: $connect
      - websocket:
          route: $disconnect
  defaultMessage:
    handler: handler.default_message
    events:
      - websocket:
          route: $default
$default 은 아무 액션이 없을때 동작하는 예약된 경로이다.
default message 처리를 위해 다음을 handler.py 에 추가한다.
def default_message(event, context):
    logger.info("Unrecognized WebSocket action received.")
    return {"statusCode": 400, "body": "Unrecognized WebSocket action."}
메세지 전송
메세지 전송을 위해 다음 코드를 handler.py 에 추가한다.
다음은 모든 연결에 broadcast 하는 예제이다.
import json

def send_message(event, context):

    # request body 가 제대로 왔는지 체크
    body = json.loads(event.get("body", ""))
    for attribute in ["content"]:
        if attribute not in body:
            logger.debug("Failed: f'{attribute}' not in message dict.")
            return {"statusCode": 400, "body": f"'{attribute}' not in message dict"}

    # 모든 연결을 가져온다
    table = dynamodb.Table("serverless-websocket-connections")
    response = table.scan(ProjectionExpression="connection_id")
    items = response.get("Items", [])
    connections = [x["connection_id"] for x in items if "connection_id" in x]

    # 모든 연결에게 broadcast
    message = {"content": content}
    logger.debug(f"Broadcasting message: {message}")
    data = {"messages": [message]}
    for connection_id in connections:
        endpoint_url = f"https://{event['requestContext']['domainName']}/{event['requestContext']['stage']}"
        gatewayapi = boto3.client("apigatewaymanagementapi", endpoint_url=endpoint_url)
        gatewayapi.post_to_connection(ConnectionId=connection_id, Data=json.dumps(data).encode('utf-8'))
    return {"statusCode": 200, "body": f"Message sent to all connections."}
마지막으로 serverless.yml 파일에 handler 를 추가해준다.
앞에서부터 모두 따라왔다면 아래와 같아야 한다.
service: serverless-websocket

provider:
  name: aws
  runtime: python3.9
  lambdaHashingVersion: '20201221'
  region: ap-northeast-2

  iamRoleStatements:
    - Effect: 'Allow'
      Action:
        - 'execute-api:ManageConnections'
      Resource:
        - 'arn:aws:execute-api:*:*:**/@connections/*'

    - Effect: 'Allow'
      Action:
        - 'dynamodb:PutItem'
        - 'dynamodb:GetItem'
        - 'dynamodb:UpdateItem'
        - 'dynamodb:DeleteItem'
        - 'dynamodb:BatchGetItem'
        - 'dynamodb:BatchWriteItem'
        - 'dynamodb:Scan'
        - 'dynamodb:Query'
      Resource:
        - 'arn:aws:dynamodb:ap-northeast-2:*:*'
functions:
  connectionManager:
    handler: handler.connection_manager
    events:
      - websocket:
          route: $connect
      - websocket:
          route: $disconnect
  defaultMessage:
    handler: handler.default_message
    events:
      - websocket:
          route: $default
  sendMessage:
    handler: handler.send_message
    events:
      - websocket:
          route: sendMessage
  ping:
    handler: handler.ping
    events:
      - http:
          path: ping
          method: get

plugins:
  - serverless-python-requirements

custom:
  pythonRequirements:
    dockerizePip: false
    noDeploy: []
모두 완료되었다면 다시 배포해보자
이번엔 serverless 의 단축어인 sls 를 사용해보자
sls deploy잘 배포되었다면 아까 배포했던것과는 다르게 endpoint 가 두줄일 것이다.
endpoints:
  GET - https://{{your-host}}.execute-api.ap-northeast-2.amazonaws.com/dev/ping
  wss://{{your-host}}.execute-api.ap-northeast-2.amazonaws.com/dev
웹소켓이 잘 동작하는지 확인하려면 wscat 을 설치하고 간단히 확인해 볼 수 있다.
npm install -g wscat설치가 완료되면 아까 받았던 wss:// 엔드포인트를 아래에 사용해서 연결해보자
wscat -c wss://{{your-host}}.execute-api.ap-northeast-2.amazonaws.com/dev연결이 성공적으로 완료되면 다음 액션을 보내 응답이 잘 오는지 확인한다.
{"action": "sendMessage", "content": "서버리스 웹소켓 API 테스트"}1부 마무리
python 으로 serverless 를 통해 websocket 서버를 만드는 예제를 따라해보았다.
만약 개인프로젝트로 사용중이라면 프리티어 한도가 꽤 높아서 과금될때까지 사용하기는 꽤 어려울것이다.
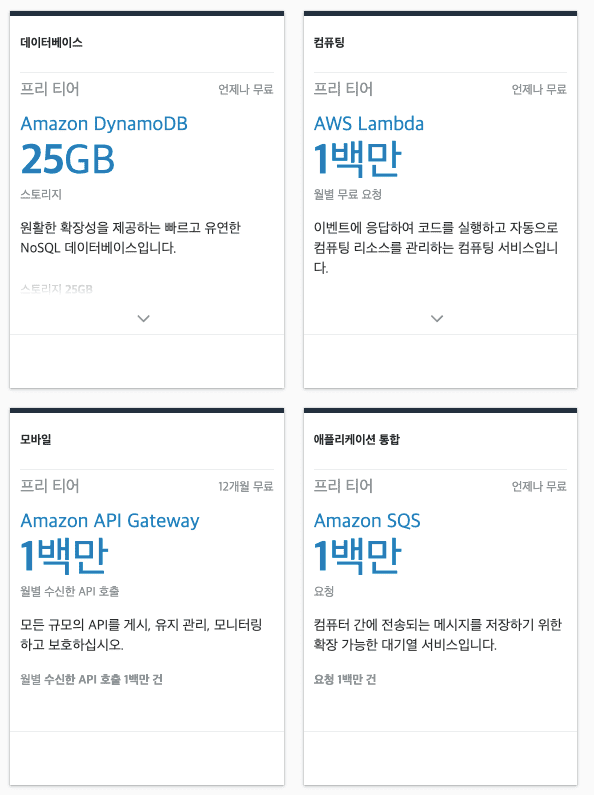
위 예제는 lambda, api gateway, dynamodb 를 사용했고 프리티어 한도는 아래와 같다.
한도를 모두 사용하더라도 100만 request 당 약 300원 꼴이니 매우 저렴하게 사용할 수 있다.

2부에서는 jwt 토큰을 이용한 인증처리와 1:1 채팅, 메세지를 저장하고 최근 메세지를 불러오는 포스팅을 할 예정이다.

![[joon hwan]](/static/9b67d409debce17da3700b0795b71a09/e5b88/profile.png)